![]()
|
|
|
|
Performance gains for your early 4.0Written by Joe Attardo, EndlessMtnFab As more and more power enhancements are
making their way into the Jeep 4.0 market, a person can not help but to
notice the majority of stuff is for “ ’91 & newer.”
An excellent example of this would be anything related to the air
intake system. The earlier
4.0s (mainly 87-90) used a computer system by the French company, Renault
(For clarity sake, we will call this non-HO motor the Renix setup).
There are several difference between these motors and the later
HO motors. Some of them include:
different computers, different cams, revised port angles, different manifolds,
and so on. One additional
difference is the size/shape/functionality of the air intake and throttle
body system. This is the
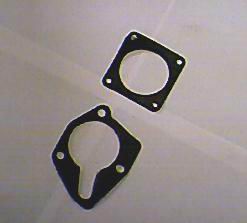
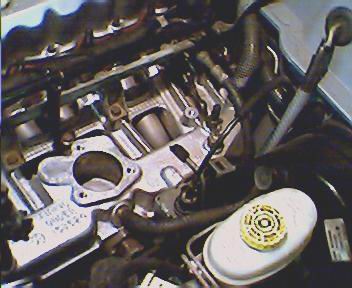
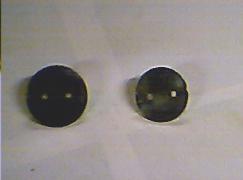
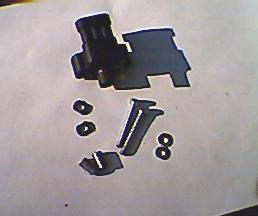
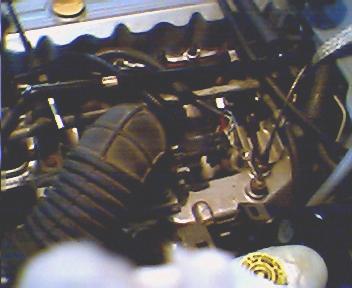
focus of the current article you are reading. I had been contemplating all possible alternatives before deciding to go the route we will discuss shortly. My ’89 motor has been ‘warmed’ up thoroughly and I knew that incoming air would be my weakest link. With that in mind, and with the help of several folks on web boards, I decided to mate the current HO throttle body to my older motor. I was able to procure an entire intake setup for a VERY fair price, which started to make the ball roll. I realized I would also need a different accelerator cable and purchased one at a local salvage yard. With these two items in hand the brain storming starts. Here, a picture of the two gaskets will help to show the different of the two bolt patterns and shapes The first thing we want to do is to remove as much of the old TB setup as we possibly can. This entails the air filter box/open filter setup, TB, accelerator cable, throttle arm, and all sensor connectors. These pictures will give you an idea of where you should be when you are done.
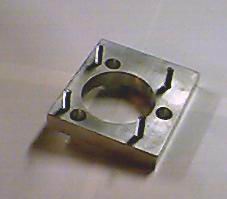
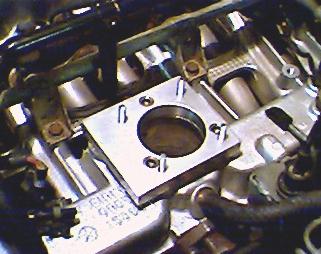
The heart of this conversion is the adapter/spacer
plate that I made, which combines both bolt patterns onto one block.
We will now be able to bolt the HO TB to the older Renix manifold.
This adapter/spacer is not unlike the adapters to mate square and
spread bore carbs/manifolds. By
acting as a small spacer, we have effectively gained a minor increase
in plenum volume. There have
been individuals who have drilled and tapped the manifold to allow the
HO throttle body to mate with the triangular bolt pattern.
I chose not to go this route because of several concerns.
Some of them include: no
spacer/plenum gain, drilling & tapping precision is lacking, potential
missed metal chips inside the runners, and inability to return or change
in the future. An interesting observation regarding the intake manifolds
and gaskets is worth noting. Despite
the different in throttle body sizes all the Jeep MPFI manifolds have
the same size opening. They
all were machined to 60-mm. With
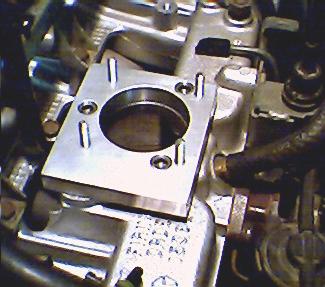
the adapter/spacer ready to go, the Renix throttle body gasket was placed
onto the manifold. The spacer/adapter
was placed over it and tightened down.
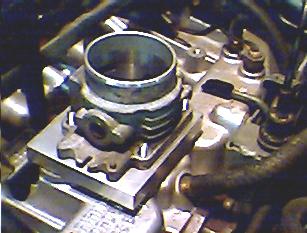
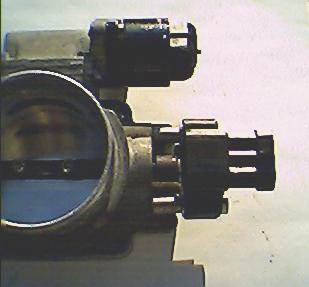
And that is what you see in the next picture. For curiosity sake, I placed the very disassembled HO throttle body casting on the adapter. Here’s what it looked like so far.
While both throttle bodies were apart I decided to
snap a shot of the size differences of the bores/butterflies.
See the picture below for a good representation. Probably the most difficult part was the mating of
the old throttle position sensor (TPS) to the new throttle body.
After much deliberation, advice, and smart remarks, an idea was
decided upon. The Renix TPS
uses a lever setup to determine how far the throttle blade is open.
The HO TPS is mated directly to the throttle shaft.
I used a Dremel tool to cut the HO TPS (which came with the throttle
body) apart and salvaged the bushing that slips over the throttle shaft. A hole was drilled through the back of the bushing and was
placed aside. I then unscrewed
the washer/lever assembly from the Renix TPS and kept one arm.
Leave the slotted arm on the TPS and place the previously mentioned
bushing in front of it. Then screw the assembly together with the same screw that was
already there. It is not
a bad idea to attempt to eyeball where the bushing should sit in relation
to the throttle shaft. If
you recall, the Renix TPS is adjustable and now you will have two sets
of adjustments. Not only
do you have the bushing now for coarse adjustments, but also you still
have the side slots for fine-tuning.
It is suggested that the side slots be widened a minor amount on
the insides of the holes (closest to the main plastic body).
The reason is the widths are just *slightly
* different. Here is a picture
of the complete assembly. A minor mod has to be made to the Idle Air Speed (IAS)
motor housing. You will have
to remove the housing from the main body using a tamper resistant torx
bit. These look like traditional
torx screws, but have a little head in the middle so you cannot easily
remove. Most auto and tool
stores sell them. Just look
around for it. LISLE tools
comes to mind immediately as a company having those bits. If you look
at the picture, there is a little stub/protrusion on the bottom of the
housing. This little piece
must be ground off, otherwise you will not be able to seat the HO TB onto
the adapter. I used a Dremel
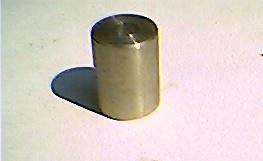
grinding bit and 30 seconds of elbow grease. The picture below shows another small set of spacers used in mating the Renix TPS to the HO throttle body. The bolts used were 5 mm x .8 pitch. I chose 50 mm and cut to length. The spacers are used to locate the modified bushing onto the throttle shaft. I kept the other washers that Jeep originally used on the Renix TB. It is slightly difficult to see the arm/lever, but it is there (look for gold color behind the spacer).
Here is a partial shot of the assembled
TB. Mainly, it is here so
you can see how the TPS looks on the throttle body casting.
The IAS motor is also bolted in place here and the clip was position
to face the intake manifold. The 2nd hardest part of this conversion
was the accelerator cable bracket.
Because the HO and Renix accelerator cables are so different, the
brackets are not reusable. There are several unused tapped boltholes in
the Renix manifold that are not compatible with the bolt patterns of the
HO bracket. However, you
can make the setup work. There was more trial/error involved here, than
brainwork. In the end, I modified the one I bought.
You will not be using the Renix accelerator cable or bracket.
This bracket now uses 2 mounts instead of the factory 3.
One mount is flipped over 180° and extended.
The other mount was simply added.
You can either weld or bolt on the new mount/arm.
To be honest, there may be a better way to set this up than as
I have described. However,
this has worked for me. If
I come up with anything better, I will update this for everyone.
There is one other fast point worth mentioning.
Because the spacer adds height to the TB assembly, it is a wise
idea to raise the accelerator bracket by a similar amount. I had these spacers you see hanging around.
But you can get something similar at Lowe’s or Home Depot (in their
hardware section). You
will need a longer bolt to match, of course.
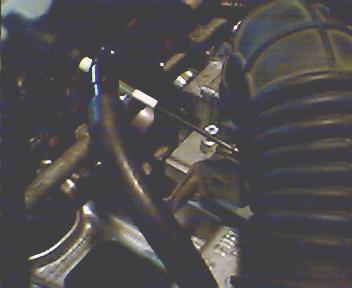
Here is a picture of the completed assembly. You can just make out the accelerator cable in the top parts of the picture. And of course, everything is bolted back up and the air filter installed.
There are a few notes & observations that I wanted to share, but did not fit anywhere in the main body of this article. As I mentioned, the HO TB tapers down to 55-mm. I took the time to have the taper removed for an additional increase in performance. The taper starts just below the throttle plate/butterfly and will neck down to 55-mm. The gaskets will both be 60-mm, so there is no need to cut them larger. Another point to note is the TPS adjustment. You may need to assemble/disassemble several times to get the voltage readings right. Use a factory service manual or Chilton’s guide for the desired settings and procedure. There is also a slight situation with the MAP sensor. Depending what year TB you get, Jeep has either fit the sensor to the TB housing or to the manifold. Either way will work as long as you keep the same size tubing (it’s a metered orifice). In my case, the TB had no provision for a MAP sensor. So I simply tied it into an existing vacuum line. You may be lucky with the TB you pick up.
And there you have it everyone! A bolt on setup that will improve the breathing power of the early 4.0 engine. As always, everyone will see a different amount of improvement, depending on the state of tune and the amount of performance enhancements (if there are any). The assembly process takes about 2-2.25 hours from start-to-finish.
All contents on this page are Copyright ©2002 RockModified.com and shall not be reproduced without the express written permission from RockModified and the owners.
|